Friday, April 17, 2015

15-April-2015: Impulse-Momentum Activity

Purpose: We will be running experiments to verify the impulse-momentum theorem.


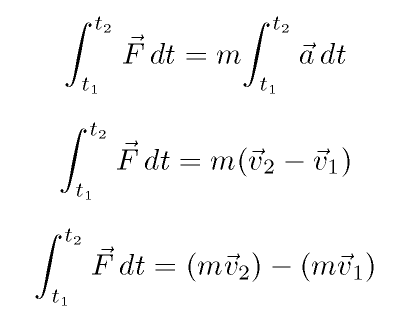
The impulse–momentum theorem states that the change in momentum of an object equals the impulse applied to it.
                       J = Δp
J = 
dt


EXPT 1: Observing Collision Forces That Change with Time


This experiment will be an elastic collision. For this experiment we will have our cart collide into a springy bit that extends out from another cart. Attached to the colliding cart is a force sensor that we will line up with the springy bit upon collision. At the other end of the track will be a motion sensor.


This apparatus will test the theorem in which  J = Δp. 
We create a force vs. time graph and velocity vs. time graph. To measure impulse acting on the cart by taking the area under the force vs. time graph for collision. We measure the change in momentum of the cart by knowing its mass and measuring its velocity before and after the collision using the motion detector.


We then did the calculations to verify the impulse-momentum theorem.


The calculated change in momentum of the cart and the measured impulse applied to it by the spring during the nearly elastic collision did not equal one another. We had an error of 4.9%.


EXPT 2: A Larger Momentum Change

This experiment is exactly the same as the first one, except this time we're adding more mass to the cart. We added 400 g  to the cart and will test if the impulse and change in momentum will equal one another.


Then we calculated the change in momentum.


The calculated change in momentum of the cart and the measured impulse applied to it by the spring during the nearly elastic collision did not equal one another. We had an error of 5.4%.


EXPT 3: Impulse-Momentum Theorem in an Inelastic Collision

This experiment will be an inelastic collision. Replacing the springy part with a wooden pole clamped to the table with a piece of clay on it. On the cart we attached to the force sensor a plunger with a nail sticking out so that upon impact the nail on the cart would inelastically collide with the clay part on the wooden pole.


We are still testing the theorem in which  J = Δp. 
This time our final velocity will be zero.


Again we did the calculations to verify the impulse-momentum theorem.


The calculated change in momentum of the cart and the measured impulse applied to it by the spring during the nearly elastic collision did not equal one another. We had an error of 3%.


For all experiment momentum is generally suppose to be conserved but the numbers say otherwise. This is due to the equipment and the method of the experiment is to enact at best a frictionless surface. So having an error in low proximity with one another is okay. In a perfect world the measured impulse and the calculated change in momentum is suppose to be the same. Showing us that impulse-momentum is conserved.

13-April-2015: Magnetic Potential Energy Lab

Purpose: We are going to demonstrate conservation of energy for a magnetic system.

The apparatus will be a frictionless cart with a magnet attached to it and on the other end another magnet of the same polarity.


We will raise the apparatus five times measuring five different angles and measuring  five different lengths from magnet to magnet (r).

For magnetic PE we will need to derive an equation we can use.

Plotting a graph of Force vs. R. Power fitting the curve gave us values for our "A" and "B".


To verify conservation of energy we leveled the track. With the air off placed the cart on the air track close to the magnet. Record data on logger pro and determine the relationship between the distance the motion detector reads and the separation distance of both magnets.


We made a graph with both KE and PE of the magnet and total energy vs. time.


Generally we were suppose to conserve the magnetic potential energy with the system. The idea was that KE and U mag give us a total of zero slope. Indicating to us that magnetic potential energy can be conserved. Varying obstacles leave some gaps in the experiment and explains why our line of total on the graph is not quite right.

Monday, April 13, 2015

08-April-2015: Conservation of Energy - Mass Spring System

Purpose: We will be determining the graphs of elastic potential energy in the spring, gravitational potential energy in the spring, kinetic energy in the spring, gravitational potential energy of the mass, and kinetic energy of the mass in a vertically-oscillating mass spring system using conservation of energy.

Before building our apparatus we have to define what GPE and KE for the spring will be. Given that the spring is moving differently at certain spots of the spring. We have to integrate both GPE and KE for the spring with respect to y.


The apparatus we set up is a spring attached to a force sensor with a mass hanging and at the bottom is a motion sensor. We take data while holding the spring at rest. Then another as it oscillates.


When we gather all our data we plot it all on to a graph vs. time.


The goal is to have our total work equal 1.


By developing these varying energies over time. We are essentially trying to prove that energy is conserved with in the experiment. The way GPE moves is suppose to be close to equal and opposite to EPE. The total of all energies would have yielded a straight line in a perfect world. But errors do occur in the equipment and measuring uncertainties.

Friday, April 10, 2015

06-April-2015: Work-Kinetic Energy Theorem Activity

Purpose: We are going to develop an understanding on how work-kinetic energy is obtain through a non-constant spring force. Then compare work done on an object with its respective change in kinetic energy.

EXPT 1: Work Done by a non-constant spring force

We are going to measure work done when a spring is stretched at a measured distance. Our set up is a cart on a track when a force probe attached to a spring onto the cart. A motion detector will be on the other side of the track.


For the cart being pulled by a horizontal force along a horizontal surface toward the motion detector. A constant and non-constant force graph of F vs. x will have work defined under the curve. This method of using an area under a curve will always give us the correct value for work, even when the forces vary with the displacements.  This idea of using the area under a curve to find the amount of work by forces that vary with displacements works even when the graphs do not form a specific geometric shape.

To obtain the spring constant a measurement of the stretch part of the spring is needed. Then you take the instantaneous moment of force and the stretched spring. That force divided by the stretched spring should give the value of the spring constant. 

EXPT 2: Kinetic Energy and the Work-Kinetic Energy Principle

The same apparatus is used for this experiment but instead of pulling the cart to the motion detector. The cart will start at a stretched length and let go while the sensors record the data. 

We plotted force and kinetic energy vs. position. Three different spots were highlighted to see that the force vs. position graph is to equal kinetic energy.


For work-energy principle the change in the kinetic energy of an object is equal to the net work done on the object.


EXPT 3: Work-KE theorem

A movie was shown where we used the experiment from it and plotted their Force vs. Position graph.


We then found the work done under the curve by splitting each section under the curve.
Total work was 25.67 N m

In the video an object with mass 4.3 kg was clocked at 45 ms at a distance given 15 cm.


We used this data to found the velocity the object was traveling.
Velocity was 3.33 m/s.


Wednesday, April 1, 2015

01-April-2015: Centripetal force with a motor

Purpose: We will need to understand and develop a relationship between θ and ω. A model for ω will be formulated and compared to a measured ω.

Our apparatus for this experiment consist of an electric motor mounted on a surveying tripod, a long shaft going vertically up from the shaft, a horizontal rod mounted on the vertical rod, a long string tied to the end of the horizontal rod, a rubber stopper at the end of the string, and a ring stand with a horizontal piece of paper. 


For this experiment we recorded data relevant to our needs to solve our unknown values. We measured the height from the ground to the top of the vertical rod, the length of the horizontal rod mounted on the vertical rod, and the length of the string attached to the rubber stopper. 

This apparatus will spin at a certain voltage. As it is spinning the rubber stopper will hit the ring stand with a horizontal piece of paper. This will give us the height from the ground to the stopper. We repeat this six times, each time at a higher voltage. Also as is it spinning for each voltage we timed how many times the device went ten revolutions, so that we could get an average time for a single period.


As the apparatus spins it will create an angle and speed. Each time the voltage is increased the angle and speed will change.

-With these measured values we will solve for θ and ω. 
-As well as develop a model that we can use to determine ω.


To develop a model for ω we begin with a free body diagram of the rubber stopper.
Next we summed the forces and determine what our radius is, solving for ω.


The measured values we inputted onto excel and used it to calculated the θ and ω. The model values are also in excel.

The measured ω is 2 pi over our period of one revolution.


For the angle we inputted this formula for column E.


Lastly we graphed a measured ω vs. a model ω to determine if the model is correct.


Conclusion The angle is found by the length of the string and the height from the ground the rubber stopper is at that moment. The angle will assist us in finding the ω at that moment. If the angle is at a larger degree the ω will in turn become larger. 
For the measured ω vs. model ω graph if the slope is one we know that our model is correct (in a perfect world). Given that we measured lengths and heights those measurement have uncertainty. We also timed the periods with a stop watch using our eyes. Those two measurements will yield slight errors. Which is why in our graph the slope is not one. We were off by the hundredth decimal point, which is not bad. If the slope was significantly off we would know something went wrong.